The current page has been visited 92037 times.
Visitors today: 2
Hits to all pages: 8182787
Server-Time: 03:10
2024-04-26
|
How to repair keyboards...
On many old keyboards sooner or later you have the problem that the one or another key doesn't respond anymore. I had to fight with this problem some years ago with old Amiga-keyboards. The acquisition of such a special keyboard is either impossible or too expensive. For that reason it is worth to consider a repair.
Most keyboards work after the following principle: Every key has a attached conductible contact made of rubber which shorteness a contact on the keyboard-mainboard when the key is pressed. This signal is processed by the keyboard controller which sends a keycode to the computer.
Such keyboards suffer from a scuff of the conductive coating of the rubber or the main board. It is also possible that the the oxygen of the air causes some corrosion. In both cases a refreshing of the coating is necessary.
The here described method of repair works for all types of keyboards based on this principle. Especially remote controls of HiFi-devices can be repaired this way, too!
(click to enlarge)
|
|
A method of repair which is approved for years for me is the renewal of the conductive coatings using graphite spray. I use the spray Graphit 33 of the company CRC Industries - Kontakt-Chemie.
This spray produces a very regular film of graphite of extraordinary quality. Unfortunately, it is not possible to spray the contacts of the keyboard as this would draw the keyboard unusable; all electrical contacts would be shortened!
|
(click to enlarge)
|
|
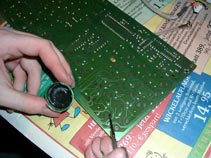
Because of this, it is necessary to give a small amount of the spray in a small container and then to give small amounts using a aid onto the contact pads. Therefore, a small screwdriver has shown to be the best tool.
Before you give the liquid graphite onto the contacts, you have to unmount and clean the keyboard. While you are about it, you can also pull off the key-caps and clean them in a hot bath of water with cleaning agent. Especially, the contact pads of the mainboard have to be cleaned using a dry cloth.
|
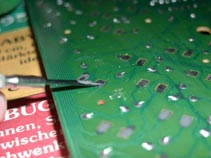
When applying the liquid graphite it is necessary to work carefully!! Even thin films of graphite are well-conductive and may lead to durable malfunction of the keyboard! It must be avoided to shorten contacts on the circuit board!
Should you have a problem while applying the graphite, you have to remove the applied graphite by scraping or wiping carefully.
|
(click to enlarge)
|
|
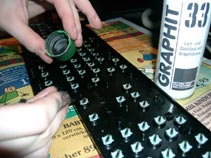
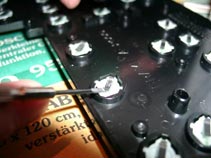
Please note, that the liquid graphite dries very quickly. Because of this, you have to work fast and to try to avoid a thick film!
The graphite has to be applied to the rubber contacts, too. This is rather unproblematic; the rubber has to be coated in full length with graphite.
|
(click to enlarge)
|
|
After all graphite coatings are dry, you can assemble the keyboard for a first functional test. In some cases it is possible that some few keys don't work correctly from the start; here you have to apply the graphite once again.
I can give you a clear idea about the endurance of the coatings applied using this method: My repaired keyboard of my Amiga 3000, which is used intensively for development work, works fine since over 5 years!
All the other keyboards (about 5-6) I have repaired with the same method, do also work fine since several years, already!
For very expensive or rare keyboards, such a repair is on the one hand a bit time-intensive, but in any case profitably!
Note: I'm not responsible for any damage caused by this tip!
|
|


